Within this article, we will provide you with the necessary information to whitelist the Atera agent in your Anti-Virus and EDR solutions.
Paths to exclude:
- C:\Program Files\Atera Networks\AteraAgent
- C:\Program Files (x86)\Atera Networks\AteraAgent
Whitelist Atera in Windows Defender
To whitelist the Atera Agent in Windows Defender, run the following commands in PowerShell with Admin rights. You can run the commands locally using PowerShell ISE (integrated scripting environment).
Add-MpPreference -ExclusionPath "C:\Program Files\Atera Networks\AteraAgent" -Force
Add-MpPreference -ExclusionPath "C:\Program Files\ATERA Networks\AteraAgent\Agent" -Force
Add-MpPreference -ExclusionPath "C:\Program Files (x86)\Atera Networks\AteraAgent" -Force
Add-MpPreference -ExclusionProcess "AteraAgent.exe" -Force
As a preventative measure, you can upload the commands in Atera and run them on your agents. This will stop Windows Defender from flagging and removing the Atera Agent.
Note: Make sure to run the commands as System, and to select the right file type, .ps1.
For more info on uploading scripts to Atera, see Create, upload, and generate scripts
Restore the Atera Agent from quarantine
If Atera were quarantined, you'd need to restore Atera and its services.
Run the following command using CMD (.bat) with Admin rights.
64-bit machine:
"C:\Program Files\Windows Defender\MpCmdRun.exe" -Restore -Name "HackTool:Win32/RemoteAdmin" -path "C:\Program Files\ATERA Networks\AteraAgent"
32-bit machine:
"C:\Program Files\Windows Defender\MpCmdRun.exe" -Restore -Name "HackTool:Win32/RemoteAdmin" -path "C:\Program Files (x86)\ATERA Networks\AteraAgent"
For more information on restoring files from quarantine, see this article by Microsoft.
Note: In case restoring the Atera Agent is not possible, a full cleanup and reinstallation of the agent should be done (see below).
Whitelist Atera in ESET
To ensure the Atera Agent installs successfully without interference from ESET, follow these steps to add or edit detection exclusions.
Note: ESET won't flag already installed agents.
Paths and files to whitelist
MSI installer
When downloading the MSI, the file name will be:
- Unassigned installation: "setup.msi"
- Site-specific installation: "setup_{SiteName}.msi"
- Customer-specific installation: "setup_{CustomerName}.msi"
As the file name changes for unassigned or site-specific installations, please ensure the correct file name is whitelisted.
As the file name changes for unassigned or customer-specific installations, please ensure the correct file name is whitelisted.
Hash exclusion
You can also generate a hash (using PowerShell or an application like VirusTotal) for the Atera Agent MSI installer to ensure file-specific exclusions.
Additional paths
Whitelist the following paths to prevent any issues with the installation of new agents on your devices:
- %PROGRAMFILES%\Atera Networks
- %WINDIR%\Temp\AteraUpgradeAgentPackage
- %WINDIR%\Temp\Agent.Package.Availability
Detection exclusion
While exclusions can help with false positives, use them cautiously to avoid exposing systems to security risks.
We recommend:
- Limiting exclusions to specific files or directories (via the ellipses button in the Path field).
- Setting exclusions for temporary periods whenever possible.
Note: Exclusions will also apply to the following categories:
- Potentially unwanted applications (PUAs)
- Potentially unsafe applications
- Suspicious applications
For more information, see Path exclusion format
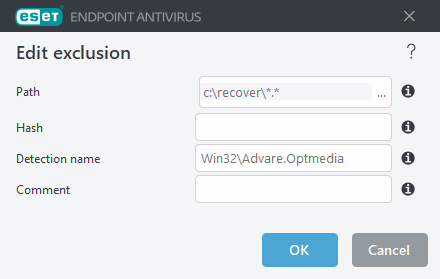
Exclude specific detections
To exclude a detection using its name, provide a valid detection name (e.g., "Win32/Adware.Optmedia"). You can also use the following format directly within the ESET Endpoint Antivirus alert window:
- @NAME=Win32/Adware.Optmedia@TYPE=ApplicUnwnt
- @NAME=Win32/TrojanDownloader.Delf.QQI@TYPE=Trojan
- @NAME=Win32/Bagle.D@TYPE=worm
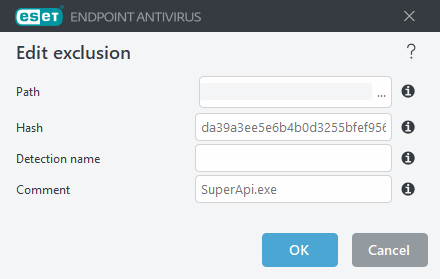
Hash exclusion
If you choose to exclude a file by its hash, the exclusion is file-specific and independent of the file's name, type, location, or extension. You can use the file's SHA-1 hash for this.
Whitelist Atera in SentinelOne
- C:\Program Files\ATERA Networks\AteraAgent
- C:\Program Files (x86)\ATERA Networks\AteraAgent
- C:\Windows\Temp\AteraUpgradeAgentPackage
Whitelist Atera in WatchGuard
2. Select Settings.
3. From the left pane, select Workstations and Servers.
4. Select an existing security settings profile to edit, copy an existing profile, or in the upper-right corner of the page, click Add to create a new profile.
The Add Settings or Edit Settings page opens.
5. Enter a Name and Description for the profile, if required.
6. Select General.
Whitelist Atera in Sophos
Global Exclusions in Sophos Central allow you to exclude specific files, folders, websites, or applications from being scanned for threats.
1. Log in: Sign in to your Sophos Central account.
2. Open Global Exclusions: Go to: My Products > General Settings > Global Exclusions.
3. Add an Exclusion by clicking Add Exclusion.
4. From the Exclusion Type dropdown, select what you want to exclude (file, folder, website, or application).
5. Enter the path or item details:
C:\Program Files\ATERA Networks\AteraAgent\Agent
C:\Program Files (x86)\Atera Networks\AteraAgent
File or Folder (Windows) specifics:
You can exclude a full path (drive, folder, or file).
Use
*as a wildcard for file names or extensions.Note:
*.*is not valid.
-
In the Active for dropdown, select when the exclusion should apply:
Real-time scanning
Scheduled scanning
Both
6, Save your changes.
Notes
Use exclusions cautiously. Overusing them may reduce protection.
Double-check paths to avoid incorrect exclusions.
Whitelist Atera in CrowdStrike
Machine Learning Exclusions allow you to prevent specific files or processes from being flagged while still logging events or controlling uploads to the cloud.
1. Navigate to Exclusion Settings: In the Falcon console, go to Configuration > Detections Management > Exclusions > Machine Learning Exclusions
2. Create a New Exclusion by clicking Create Exclusion then choose whether the exclusion applies to:
All hosts
Specific host groups
3. Configure Exclusion Details:
-
Exclusion Type:
Detect/Prevent → Stops detection/prevention but logs events to the cloud.
Upload to CrowdStrike → Prevents file uploads to the cloud (optional, off by default).
4. Define the Exclusion Pattern for:
- "C:\Program Files\ATERA Networks\AteraAgent\Agent"
- "C:\Program Files (x86)\Atera Networks\AteraAgent"
Use glob syntax to define the pattern.
Example
C:\Program Files\ATERA Networks\AteraAgent\Agent\*.exe
C:\Program Files (x86)\Atera Networks\AteraAgent\*.exe
Notes
Apply exclusions only when necessary to avoid reducing protection.
Always test exclusions on a small group of hosts before applying globally.
Whitelist Atera in Bitdefender
Exclusions in GravityZone let you prevent certain files, folders, or processes from being scanned. You can add them directly in a policy (Method A) or through configuration profiles for reuse across multiple policies (Method B).
Method A: In-Policy Exclusion
1. Log in to the GravityZone Control Center.
2. Go to Policies and open the policy you want to edit.
3. In the policy menu, navigate to Antimalware > Exclusions. If needed, toggle In-policy exclusions on.
4. From the exclusion type dropdown, select Folder, File, or Process depending on what you need.
5. Enter the full path, use system variables, or apply wildcards. Choose the scanning modules this exclusion should apply to (On-Access, On-Execute/On-Demand, ATC/IDS, Ransomware Mitigation, or All).
6. Add an optional description, then click Add > Save to apply the changes.
Example: To exclude, choose Folder, enter the path, and select the minimum required modules.
"C:\Program Files\ATERA Networks\AteraAgent\Agent"
- "C:\Program Files (x86)\Atera Networks\AteraAgent"
Method B: Configuration Profile Exclusion
1. Log in to GravityZone.
2. Go to Policies → Configuration profiles and open Exclusions.
3. Click Add Exclusions and select the object type (Folder, File, or Process).
"C:\Program Files\ATERA Networks\AteraAgent\Agent"
- "C:\Program Files (x86)\Atera Networks\AteraAgent"
4. Click Add → Save.
5. Select the exclusion you created, then click Assign to lists. Choose an existing exclusion list or create a new one.
6. Return to the Policies page, open the policy you want, and go to Antimalware > Exclusions. Enable Exclusions from configuration profiles, select the exclusion list you created, then click Apply > Save.
Notes
Use in-policy exclusions for quick, one-off adjustments.
Use configuration profile exclusions if you want consistency across multiple policies.
Always start with the minimum modules required to reduce security risks.
Whitelist Atera in ThreatDown / Malwarebytes
You can create exclusions in Malwarebytes either from the Nebula (ThreatDown EDR / Cloud Console) for managed endpoints, or locally in Malwarebytes for Windows. Exclusions prevent specific files, folders, or items from being detected while still protecting the system.
Method A: Nebula (ThreatDown EDR / Cloud Console)
1. Sign in to the Nebula console.
2. In the left menu, go to Configure → Exclusions and click New Exclusion.
3. In the Add Exclusions window:
4. Switch Enable/Disable to On.
5. Enter the path(s) you want excluded (one per line).
"C:\Program Files\ATERA Networks\AteraAgent\Agent"
"C:\Program Files (x86)\Atera Networks\AteraAgent"
6. Set Applies to as Global (all endpoints) or choose specific policies.
7. Add a short Comment (who/why).
8. From the Exclusion Type dropdown, select what you’re excluding (File by Path, Folder by Path, MD5 Hash, Registry Key, Website, IP, Command Line, etc.).
Wildcards and system variables are supported (e.g.
%PROGRAMFILES%,%PROGRAMDATA%,*,**,?).
8. Click Validate, confirm the entry, then Save.
9. Exclusions will take effect after endpoints sync with the console.
Fast method from an alert:
Go to Monitor → Detection Center → Detection Log (or Active Detections).
Select a detection you’ve confirmed as safe.
Click Actions → Create Exclusion and follow the prompts.
Method B: Malwarebytes for Windows (local allow list)
1. Open Malwarebytes for Windows.
2. Go to Detection History or Settings → Exclusions (depending on version).
3. Open the Allow List and click Add.
4. Select Allow a file or folder, then browse to the item you want excluded.
5. Choose which detection types to exclude it from (All, Malware/PUP only, Ransomware only).
6. Click Done to apply.
Notes
Use exclusions only after confirming the file, folder, or process is safe.
Always start with the narrowest exclusion possible (specific file before folder).
In Nebula, global exclusions affect all endpoints, so apply carefully.
Whitelist Atera in Palo Alto Cortex XDR
Exclusions in Cortex XDR can be applied in two ways:
Allow List in a Malware Prevention Profile (specific, recommended).
Disable Prevention Rule (broader, temporary; use sparingly).
Method A: Add Path to Malware Prevention Profile Allow List
1. In Cortex XDR, go to Endpoints → Policy Management → Prevention → Profiles.
2. Locate the Malware Prevention profile applied to your target endpoints and click Edit.
3. In the profile settings, find Files / Folders in Allow List.
4. Click +Add, enter the full file or folder path you want to exclude, and save the profile.
5. Confirm the profile is attached to the correct Prevention policy for the relevant host groups.
This method excludes a file or folder path from malware examination for endpoints using that profile.
Method B: Create a Disable Prevention Rule
1. In Cortex XDR, open Settings > Exception Configuration > Disable Prevention Rules.
2. Click +Add Rule and choose the platform (e.g., Windows).
3. Enter the Process Name and full path of the executable you want to bypass.
4. Set a time limit (recommended) and define the scope (apply to specific Exception Profiles or all).
5. Enable the rule, save, and ensure the correct Exception Profile is linked to the right endpoints via policy.
This method temporarily bypasses prevention modules for the process you specify. It is useful for urgent false positives during software updates or changes but should be used cautiously.
Notes
Prefer Allow List exclusions for precise, long-term exceptions.
Use Disable Prevention Rules only for temporary workarounds, and always with a time limit.